In this post we offer a few tips and tricks from our ‘pros’ that can help you manage your print infrastructure. The print management tips are illustrated using a Canon print driver in a Microsoft Windows environment. These however can often be translated to any printer manufacture / vendor.
Color / Paper Management
Has your office seen too many days (and bills) of excess color usage? How about too much paper usage due to single sided printing? Follow these steps to help curb your excess usage.
Pro Tip #1: Default the Shared Print Driver to Black and White
Most work environments use a print server with a centrally hosted print driver that is shared to personnel throughout the office. Your IT admin can log into the server and default the driver to black and white for all persons using the driver. These steps can also be used on a local environment, so you can change your print driver on a workstation also.
Step 1:
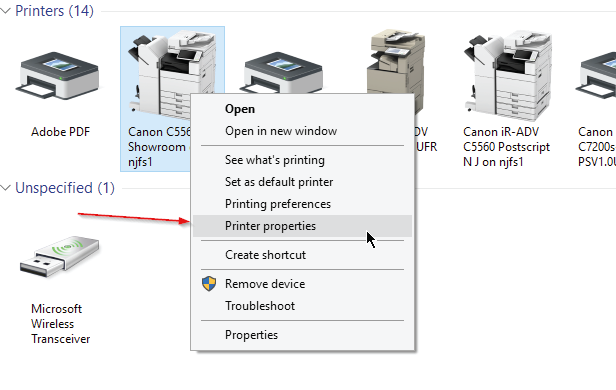
- Go to print management on the server or devices and printers on a workstation.
- Right click the driver you wish to default and select ‘printer properties’
Step 2:
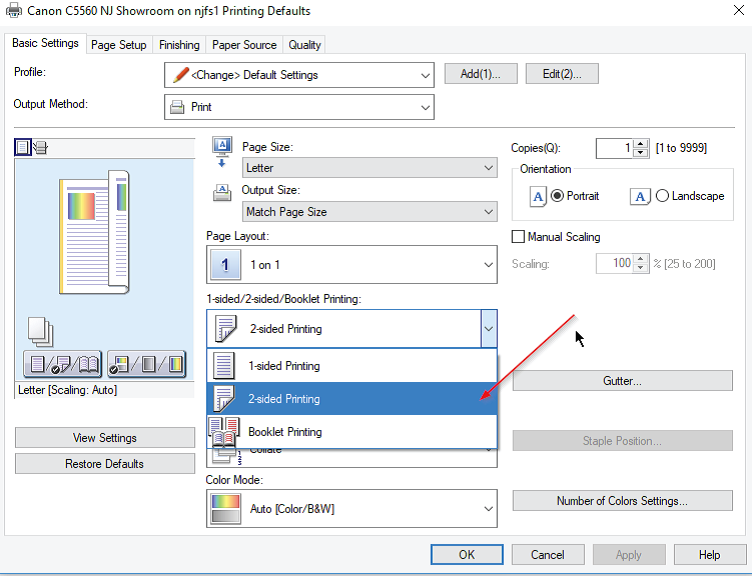
- Navigate to the advanced tab and select ‘printing defaults’

Step 3:
- Select ‘Black and White’ as the print option. The location of this may vary between manufacturers but it should be marked clearly either on the 1st tab or 2nd.
- After selecting black and white click ‘apply’ then ‘ok’ to exit the print driver defaults.

Step 4:
- Click ‘ok’ on the properties screen of the print driver and you are DONE!
- If this is done on a server it will take a few minutes to roll out to your local network. The change is immediate if done directly on a desktop.

Pro Tip #2: Use Two Drivers Instead of One!
This is an optional tactic. In some environments, it is more convenient to have (2) of the same print drivers and to default each one to either color or black and white. Have your IT admin create a duplicate print driver and rename it to reflect the default settings.
Using pro tip #1, one driver can be set to color and the other to black and white.
See illustration below.

Pro Tip #3: Default Printing to Double Sided
In some environments printer drivers are often set to single sided printing. If this is causing wasteful paper usage and/or your company seeks to implement some ‘greener’ practices, follow these simple steps.
Step 1:
- Using ‘Pro Tip #1’ as a guideline, navigate to the drivers default settings.
Step 2:
- Select ‘2-sided printing’
- Click Apply and Ok as per above and you are done.
Pro Tip #4 (Advanced): Restricting Security on A Print Driver
There are cases in some office environments where enhanced security is needed to restrict an end user’s options on changing settings. Typically, we would see these types of security implementations done in enterprise environments or in environments with wasteful spending despite some of the measures listed above.
These steps are for Microsoft Windows domain environments and are meant to be implemented on a print server.
Step 1:
- Go to print management on the server.
- Right click the driver you wish to default and select ‘printer properties’
- Navigate to the ‘Security’ tab.
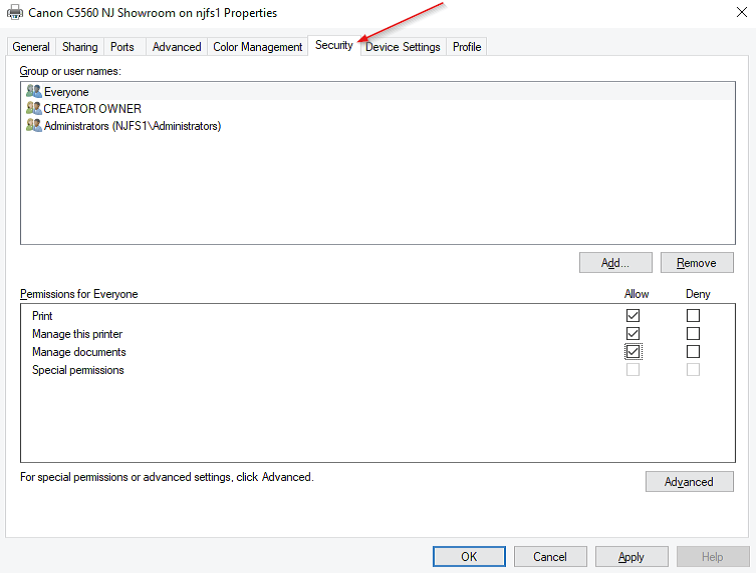
Step 2:
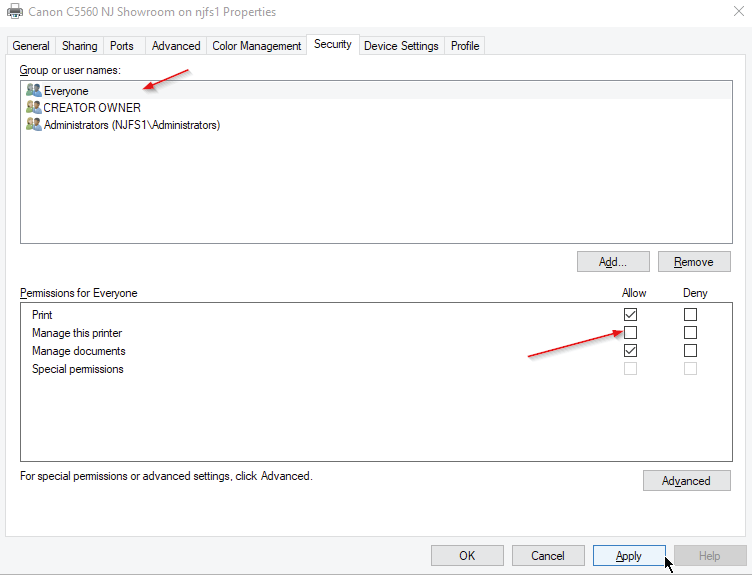
- Select ‘Everyone’
- Uncheck ‘Manage this printer’
- Click Apply.
By setting this step it will prevent all users except domain administrators from making any changes to the print driver, including the settings of color and or single sided printing. This will effectively lock down the driver.
Step 3 (Optional):
As an optional your IT admin can manually add specific users or groups to be able to manage this printer, thus restoring the ability to manipulate the driver at the desktop level. IE – set to color, single sided, etc…
- Click the Add button.
- Your network admin then chooses the appropriate person or persons to manipulate the driver.
- Be sure the option of ‘Manage This Printer’ is checked for the added user or group.
- Hit OK to make sure the driver settings are saved.

Pro Tip #5 (Advanced): Department IDs or User Codes
Did you know that out of the box most MFP’s have the ability for enhanced color management and tracking? The concept is to assign a specific ID and or Code per user or department. When color printing is triggered a pop-up will occur at the print driver level which will prompt the user to then enter their ID and or Code. Using this method your business can enable basic tracking of usage and excess expenditures.
If you are interested in learning about enabling this feature contact Docutrend today!